What is Auto-GPT, why do I need to care?

Are you interested in the latest advancements in artificial intelligence? 

If so, you might want to check out Auto-GPT, an experimental open-source application that showcases the capabilities of the GPT-4 language model. This program is driven by GPT-4 and autonomously develops and manages businesses to increase net worth. As one of the first examples of GPT-4 running fully autonomously, Auto-GPT pushes the boundaries of what is possible with AI.
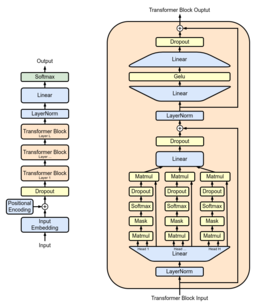

Full GPT architecture
GPT Architecture

If you're curious about Auto-GPT, you'll be pleased to know that a demo was recently released on March 30th, 2023. So, what can Auto-GPT do? Well, it has a range of features, including internet access for searches and information gathering, long-term and short-term memory management, GPT-4 instances for text generation, access to popular websites and platforms, file storage and summarization with GPT-3.5, and much more.


To use Auto-GPT, you'll need Python 3.7 or later and an OpenAI API key. If you want to use Speech Mode, you'll also need an ElevenLabs Key. Installation is straightforward, and you can find step-by-step instructions on the Auto-GPT GitHub page.

Once installed, you can run the main.py Python script in your terminal. After each of Auto-GPT's actions, type "NEXT COMMAND" to authorize them to continue. To exit the program, type "exit" and press Enter.

If you want to use Speech Mode, simply add the "--speak" command when running the script. Additionally, if you're having issues with error 429 when running Google search, you can use the official Google API by following the instructions provided on the Auto-GPT GitHub page.

Overall, Auto-GPT is a fascinating example of what AI can do, and it's exciting to see the boundaries of what's possible being pushed even further with the release of GPT-4. If you're interested in the potential of AI and want to stay up to date on the latest developments, be sure to keep an eye on Auto-GPT.

Popular posts from this blog

How to Create a Simple Budget Calculator Using Python?

Are you looking for an easy and efficient way to keep track of your finances?  Look no further than this tutorial on how to create a simple budget calculator using the Python programming language. Introduction Python is a versatile and user-friendly programming language that can be used for a wide range of applications, including budgeting. This tutorial will walk you through the process of creating a simple budget calculator that allows you to input your income and expenses, and calculate your total income and expenses. Materials To follow along with this tutorial, you will need the following: A computer with a Python development environment set up (such as IDLE or PyCharm) Basic knowledge of Python programming concepts, such as variables, loops, and functions Creating the Budget Calculator How to Create a Simple Budget Calculator Using Python? The first step in creating the budget calculator is to define the income and expense functions. In the code provided, the income function ...

Building an Art Gallery Program in Python

Building an Art Gallery Program in Python As an art lover, you may have considered creating a program to manage your favorite art pieces and display them in a virtual art gallery. This program can help you keep track of the details of each piece, including the image, description, and price. In this article, we will go through the process of building an art gallery program using Python and several libraries, including Tkinter, Pillow, and Pandas. Importing Necessary Libraries Before we start building our program, we need to import the libraries that we will be using. Tkinter will be used for creating the GUI, Pillow for handling image processing, and Pandas for data management. Creating the Art Gallery Class Next, we create a class for the art gallery program and initialize the necessary variables, such as the list of art pieces, their images, descriptions, and prices. We will also define the main window and its features, such as buttons for adding, editing, and removing art pieces, and...

Build an AI-Powered Task Management System with OpenAI and Pinecone APIs

AI-Powered Task Management System with Python and OpenAI: A Pared-Down Version of Task-Driven Autonomous Agent If you're looking for a Python script that demonstrates an AI-powered task management system, look no further than BabyAGI. This script utilizes the APIs of OpenAI and Pinecone to prioritize, create, and execute tasks based on a predefined objective and the result of previous tasks. Build an AI-Powered Task Management System with OpenAI and Pinecone APIs The main idea behind BabyAGI is that it takes the result of previous tasks and creates new ones based on the objective using OpenAI's natural language processing (NLP) capabilities. Pinecone is then used to store and retrieve task results for context. Although it's a pared-down version of the original Task-Driven Autonomous Agent, it still packs a punch in terms of its functionality.  How It Works The script works by running an infinite loop that goes through the following steps: Pull the first task from the task l...

HuggingGPT: Solving AI Tasks with ChatGPT and its Friends in HuggingFace

Artificial intelligence (AI) is rapidly evolving, and language models (LMs) are becoming increasingly capable of helping us solve complex AI tasks. As the complexity of AI tasks increases, so does the need for LMs to interface with numerous AI models. This is where HuggingGPT comes in. In this article, we'll take a closer look at HuggingGPT and how it can help you solve complex AI tasks.  HuggingGPT: Solving AI Tasks with ChatGPT and its Friends in HuggingFace HuggingGPT is a collaborative system that consists of an LLM as the controller and numerous expert models as collaborative executors. The workflow of the HuggingGPT system consists of four stages: Task Planning, Model Selection, Task Execution, and Response Generation. Let's take a closer look at each of these stages. Task Planning The first stage of the HuggingGPT system is Task Planning. Using ChatGPT, HuggingGPT analyzes the requests of users to understand their intention, and disassemble them into possible solvable ta...

How to Create a Simple Image Viewer with Python?

How to Create a Simple Image Viewer with Python? In this article, we will go through the steps of creating a simple image viewer app using Python's GUI library Tkinter. This app allows the user to navigate through a folder of images, viewing each one in turn. Introduction Have you ever wanted to view a folder of images in an organized manner? Well, look no further! With a little bit of Python code, you can create a simple image viewer that does exactly that. We'll be using Tkinter, a popular Python GUI library, to make this app. Building the App The first step in building the image viewer app is to import the required libraries and create a GUI window using Tkinter. You'll then need to specify the dimensions of the window, as well as its title, font, and other visual elements. Once the window is set up, you can start adding widgets to it. In this case, we'll be using label widgets to display the images. To navigate through the images, we'll add buttons for "Nex...